
大家好,我是考100分的小小码 ,祝大家学习进步,加薪顺利呀。今天说一说kali激活phpstorm_kali+phpstorm+xdebug+firefox配置本地/远程调试,希望您对编程的造诣更进一步.
kali激活phpstorm_kali+phpstorm+xdebug+firefox配置本地/远程调试
本地调试:
本地环境:kali(192.168.12.35)+phpstorm2019.1.3+xdebug+firefox
1)安装配置xdebug:
根据phpinfo下载xdebug
1. Download xdebug-2.9.2.tgz
2. Install the pre-requisites for compiling PHP extensions. On your Debian system, install them with: apt-get install php-dev autoconf automake
3. Unpack the downloaded file with tar -xvzf xdebug-2.9.2.tgz
4. Run: cd xdebug-2.9.2
5. Run: phpize (See the FAQ if you don’t have phpize).
As part of its output it should show:
Configuring for:
…
Zend Module Api No: xxxxxxxx
Zend Extension Api No: xxxxxxxxx
If it does not, you are using the wrong phpize. Please follow this FAQ entry and skip the next step.
11.Run: https://blog.csdn.net/weixin_/article/details/configure
12.Run: make
13.Run: cp modules/xdebug.so /usr/lib/php/xxxxxxxx
14.Update /etc/php/7.x/apache2/php.ini and change the line
zend_extension = /usr/lib/php/xxxxxxxx/xdebug.so
Make sure that zend_extension = /usr/lib/php/xxxxxxxx/xdebug.so is below the line for OPcache.
15.Restart the webserver
php.ini:
末尾
[XDebug]
zend_extension = /usr/lib/php/xxxxxxxx/xdebug.so
; Debug Config
xdebug.remote_enable = 1
xdebug.remote_handler = "dbgp"
xxdebug.remote_mode = "req"
xdebug.remote_host = "127.0.0.1"
xdebug.remote_port = 9010
xdebug.remote_log = "/var/log/php-fpm/xdebug.log"
xdebug.remote_autostart = off
xdebug.idekey = "PHPSTORM"
; Profiler Config
xdebug.profiler_append = 0
xdebug.profiler_enable = 1
xdebug.profiler_output_dir = "/tmp/xdebug"
xdebug.trace_output_dir = "/tmp/xdebug"
xdebug.profiler_enable_trigger = 0
xdebug.profiler_output_name = "cache.out.%t-%s"
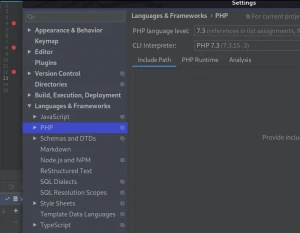
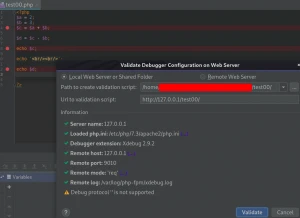
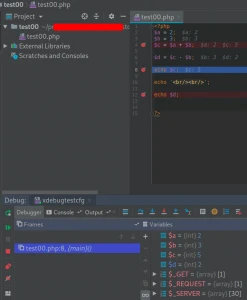
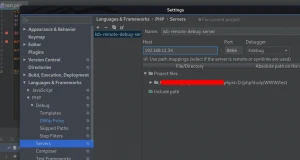
2)配置phpstorm


远程调试
远程环境:win7(192.168.12.34)+phpstudy2016(php5.4.45+apache:8866)+xdebug
本地环境:kali(192.168.12.35)+phpstorm2019.1.3+xdebug+firefox
1)安装配置远程xdebug
phpstudy直接可直接开启php扩展xdebug
[XDebug]
xdebug.profiler_output_dir="D:phpStudy mpxdebug"
xdebug.trace_output_dir="D:phpStudy mpxdebug"
zend_extension="D:phpStudyphpphp-5.4.45extphp_xdebug.dll"
xdebug.profiler_append = 0
xdebug.profiler_enable = 1
xdebug.profiler_enable_trigger = 0
xdebug.profiler_output_name = "cache.out.%t-%s"
xdebug.remote_enable = 1
xdebug.remote_handler = "dbgp"
xdebug.remote_mode = "req"
xdebug.remote_host = "192.168.12.35"
xdebug.remote_port = 9001
xdebug.idekey= PHPSTORM
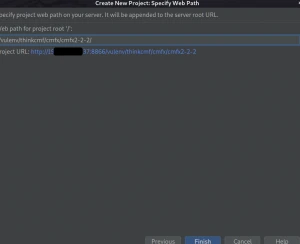
2)配置phpstorm
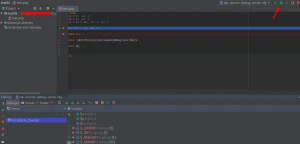
/*
配置ftp部署同步


*/


版权声明:本文内容由互联网用户自发贡献,该文观点仅代表作者本人。本站仅提供信息存储空间服务,不拥有所有权,不承担相关法律责任。如发现本站有涉嫌侵权/违法违规的内容, 请发送邮件至 举报,一经查实,本站将立刻删除。
如需转载请保留出处:https://daima100.com/phpstrom-ji-h/5597.html